第2回です。
今回はSplitViewを作ります。iPadアプリなUIといえばこれですね。
※ ちなみに、IBを使えば新規プロジェクトでSplitVIew basedを選ぶだけで終わりです。
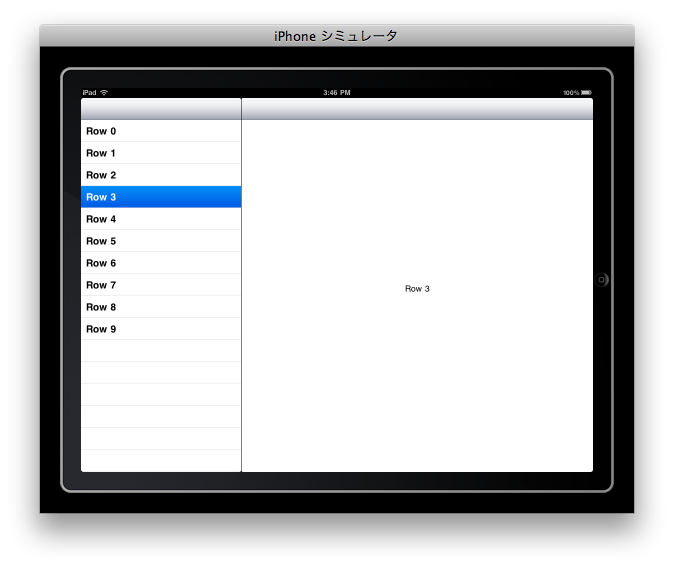
作るのは2ペインの単純なアプリ。
左ペインで選んだ文字列を、右ペインに表示するだけです。
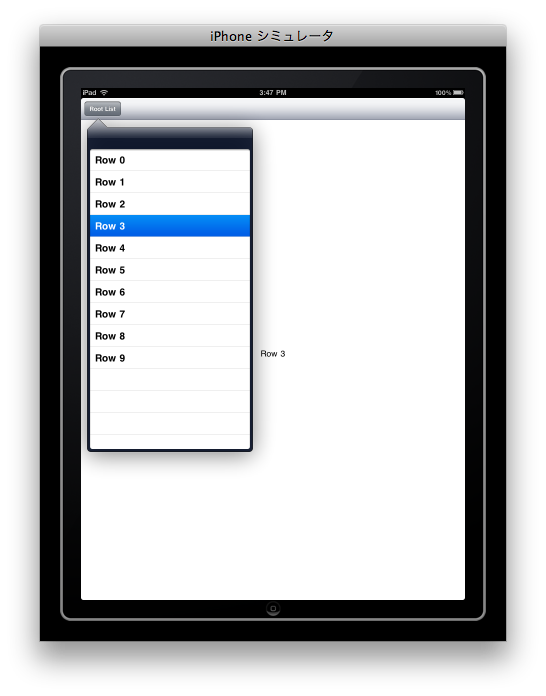
(Portraitモードの時は1ペインにして、代わりにPopViewを使用します)
まだテキストエディタとしての機能はありません。
それでは早速始めます。
[参考文献]
今回の参考サイトは以下のとおり。
参考書籍は第1回をご参照下さい。
iPadで追加されたUISplitViewを試してみる « CLSmooth BLOG…
RootViewController
まずはleft paneとなるRootViewControllerを作ります。
と言っても特別なことはしておらず、何の変哲もないTableViewControllerです。
RootViewController.h
ヘッダファイルはこんな感じです。
#import

@class DetailViewController;

@interface RootViewController : UITableViewController {
    DetailViewController *detailViewController;
}

//@property (nonatomic, retain) IBOutlet DetailViewController *detailViewController;
@property (nonatomic, retain) DetailViewController *detailViewController;

@end
RootViewController.m
お次は実装ファイル。
#import "RootViewController.h"
#import "DetailViewController.h"


@implementation RootViewController

@synthesize detailViewController;


#pragma mark -
#pragma mark View lifecycle

- (void)viewDidLoad {
    [super viewDidLoad];
    self.clearsSelectionOnViewWillAppear = NO;
    self.contentSizeForViewInPopover = CGSizeMake(320.0, 600.0);
}

/*
- (void)viewWillAppear:(BOOL)animated {
    [super viewWillAppear:animated];
}
*/
/*
- (void)viewDidAppear:(BOOL)animated {
    [super viewDidAppear:animated];
}
*/
/*
- (void)viewWillDisappear:(BOOL)animated {
    [super viewWillDisappear:animated];
}
*/
/*
- (void)viewDidDisappear:(BOOL)animated {
    [super viewDidDisappear:animated];
}
*/

// Ensure that the view controller supports rotation and that the split view can therefore show in both portrait and landscape.
- (BOOL)shouldAutorotateToInterfaceOrientation:(UIInterfaceOrientation)interfaceOrientation {
    return YES;
}


#pragma mark -
#pragma mark Table view data source

- (NSInteger)numberOfSectionsInTableView:(UITableView *)aTableView {
    // Return the number of sections.
    return 1;
}


- (NSInteger)tableView:(UITableView *)aTableView numberOfRowsInSection:(NSInteger)section {
    // Return the number of rows in the section.
    return 10;
}


- (UITableViewCell *)tableView:(UITableView *)tableView cellForRowAtIndexPath:(NSIndexPath *)indexPath {

    static NSString *CellIdentifier = @"CellIdentifier";

    // Dequeue or create a cell of the appropriate type.
    UITableViewCell *cell = [tableView dequeueReusableCellWithIdentifier:CellIdentifier];
    if (cell == nil) {
        cell = [[[UITableViewCell alloc] initWithStyle:UITableViewCellStyleDefault reuseIdentifier:CellIdentifier] autorelease];
        cell.accessoryType = UITableViewCellAccessoryNone;
    }

    // Configure the cell.
    cell.textLabel.text = [NSString stringWithFormat:@"Row %d", indexPath.row];
    return cell;
}


/*
// Override to support conditional editing of the table view.
- (BOOL)tableView:(UITableView *)tableView canEditRowAtIndexPath:(NSIndexPath *)indexPath {
    // Return NO if you do not want the specified item to be editable.
    return YES;
}
*/


/*
// Override to support editing the table view.
- (void)tableView:(UITableView *)tableView commitEditingStyle:(UITableViewCellEditingStyle)editingStyle forRowAtIndexPath:(NSIndexPath *)indexPath {

    if (editingStyle == UITableViewCellEditingStyleDelete) {
        // Delete the row from the data source
        [tableView deleteRowsAtIndexPaths:[NSArray arrayWithObject:indexPath] withRowAnimation:YES];
    }
    else if (editingStyle == UITableViewCellEditingStyleInsert) {
        // Create a new instance of the appropriate class, insert it into the array, and add a new row to the table view
    }
}
*/


/*
// Override to support rearranging the table view.
- (void)tableView:(UITableView *)tableView moveRowAtIndexPath:(NSIndexPath *)fromIndexPath toIndexPath:(NSIndexPath *)toIndexPath {
}
*/


/*
// Override to support conditional rearranging of the table view.
- (BOOL)tableView:(UITableView *)tableView canMoveRowAtIndexPath:(NSIndexPath *)indexPath {
    // Return NO if you do not want the item to be re-orderable.
    return YES;
}
*/


#pragma mark -
#pragma mark Table view delegate

- (void)tableView:(UITableView *)aTableView didSelectRowAtIndexPath:(NSIndexPath *)indexPath {

    /*
     When a row is selected, set the detail view controller's detail item to the item associated with the selected row.
     */
    detailViewController.detailItem = [NSString stringWithFormat:@"Row %d", indexPath.row];
}


#pragma mark -
#pragma mark Memory management

- (void)didReceiveMemoryWarning {
    // Releases the view if it doesn't have a superview.
    [super didReceiveMemoryWarning];

    // Relinquish ownership any cached data, images, etc. that aren't in use.
}

- (void)viewDidUnload {
    // Relinquish ownership of anything that can be recreated in viewDidLoad or on demand.
    // For example: self.myOutlet = nil;
}


- (void)dealloc {
    [detailViewController release];
    [super dealloc];
}


@end
もうお気づきかもしれませんが、IBでSplitVIew basedを選択した時に自動作成されるファイルを流用しています。
プロな方はどうか知りませんが、少なくとも僕はこんな内容を一から書くスキルも元気もありません。
というわけで、太字部分以外はそのままです。
(つまりヘッダファイルのプロパティからIBOutletを削っただけ)
DetailViewController
次にright paneとなる、DetailVIewControllerです。
見た目は単なるToolbar付きViewControllerですが、
UISplitViewControllerのDelegteとなっており、
画面が回転した際、ToolbarにPopover用のボタンを追加・削除する機能を持ちます。
DetailViewController.h
まずはヘッダファイル。rootview同様、IBOutletを消すだけです。
#import

@interface DetailViewController : UIViewController  {

    UIPopoverController *popoverController;
    UIToolbar *toolbar;

    id detailItem;
    UILabel *detailDescriptionLabel;
}

//@property (nonatomic, retain) IBOutlet UIToolbar *toolbar;
@property (nonatomic, retain) UIToolbar *toolbar;

@property (nonatomic, retain) id detailItem;
//@property (nonatomic, retain) IBOutlet UILabel *detailDescriptionLabel;
@property (nonatomic, retain) UILabel *detailDescriptionLabel;

@end
DetailViewController.m
次に実装。長いですが、最後にinitメソッドを追加して、
IBの代わりにtoolbar、labelを作成しているだけです。
#import "DetailViewController.h"
#import "RootViewController.h"


@interface DetailViewController ()
@property (nonatomic, retain) UIPopoverController *popoverController;
- (void)configureView;
@end


@implementation DetailViewController

@synthesize toolbar, popoverController, detailItem, detailDescriptionLabel;

#pragma mark -
#pragma mark Managing the detail item

/*
 When setting the detail item, update the view and dismiss the popover controller if it's showing.
 */
- (void)setDetailItem:(id)newDetailItem {
    if (detailItem != newDetailItem) {
        [detailItem release];
        detailItem = [newDetailItem retain];

        // Update the view.
        [self configureView];
    }

    if (popoverController != nil) {
        [popoverController dismissPopoverAnimated:YES];
    }
}


- (void)configureView {
    // Update the user interface for the detail item.
    detailDescriptionLabel.text = [detailItem description];
}


#pragma mark -
#pragma mark Split view support

- (void)splitViewController: (UISplitViewController*)svc willHideViewController:(UIViewController *)aViewController withBarButtonItem:(UIBarButtonItem*)barButtonItem forPopoverController: (UIPopoverController*)pc {

    barButtonItem.title = @"Root List";
    NSMutableArray *items = [[toolbar items] mutableCopy];
    [items insertObject:barButtonItem atIndex:0];
    [toolbar setItems:items animated:YES];
    [items release];
    self.popoverController = pc;
}


// Called when the view is shown again in the split view, invalidating the button and popover controller.
- (void)splitViewController: (UISplitViewController*)svc willShowViewController:(UIViewController *)aViewController invalidatingBarButtonItem:(UIBarButtonItem *)barButtonItem {

    NSMutableArray *items = [[toolbar items] mutableCopy];
    [items removeObjectAtIndex:0];
    [toolbar setItems:items animated:YES];
    [items release];
    self.popoverController = nil;
}


#pragma mark -
#pragma mark Rotation support

// Ensure that the view controller supports rotation and that the split view can therefore show in both portrait and landscape.
- (BOOL)shouldAutorotateToInterfaceOrientation:(UIInterfaceOrientation)interfaceOrientation {
    return YES;
}


#pragma mark -
#pragma mark View lifecycle

/*
 // Implement viewDidLoad to do additional setup after loading the view, typically from a nib.
- (void)viewDidLoad {
    [super viewDidLoad];
}
 */

/*
- (void)viewWillAppear:(BOOL)animated {
    [super viewWillAppear:animated];
}
*/
/*
- (void)viewDidAppear:(BOOL)animated {
    [super viewDidAppear:animated];
}
*/
/*
- (void)viewWillDisappear:(BOOL)animated {
    [super viewWillDisappear:animated];
}
*/
/*
- (void)viewDidDisappear:(BOOL)animated {
    [super viewDidDisappear:animated];
}
*/

- (void)viewDidUnload {
    // Release any retained subviews of the main view.
    // e.g. self.myOutlet = nil;
    self.popoverController = nil;
}


#pragma mark -
#pragma mark Memory management

/*
- (void)didReceiveMemoryWarning {
    // Releases the view if it doesn't have a superview.
    [super didReceiveMemoryWarning];

    // Release any cached data, images, etc that aren't in use.
}
*/

- (void)dealloc {
    [popoverController release];
    [toolbar release];

    [detailItem release];
    [detailDescriptionLabel release];
    [super dealloc];
}

- (id)init {
	if (self = [super init]) {
		self.view.backgroundColor = [UIColor whiteColor];

		toolbar = [[UIToolbar alloc] init];
		[toolbar sizeToFit];
		[self.view addSubview:toolbar];
		// これやっとかないとpopview出すボタンが追加できない([toolbar items]がnullになるから)
		[toolbar setItems: [NSArray array]];

		// heightはdefaultのfontsizeに合わせて17
		detailDescriptionLabel = [[UILabel alloc] initWithFrame: CGRectMake(0, self.view.bounds.size.height * 0.5, self.view.bounds.size.width, 17)];
		// 常に上下中央
		detailDescriptionLabel.autoresizingMask = UIViewAutoresizingFlexibleWidth | UIViewAutoresizingFlexibleTopMargin | UIViewAutoresizingFlexibleBottomMargin;
		detailDescriptionLabel.textAlignment = UITextAlignmentCenter;

		detailDescriptionLabel.text = @"Detail view content goes here";
		[self.view addSubview:detailDescriptionLabel];
	}
	return self;
}

@end
AppDelegate
最後にAppDelegate。
実はこいつが一番修正が多かったりする。
(太字が前回からの修正点)
AppDelegate.h
rootとdetailのヘッダファイルをimport。
#import

#import "RootViewController.h"
#import "DetailViewController.h"

@interface EdhitaAppDelegate : NSObject  {
    UIWindow *window;
}

//@property (nonatomic, retain) IBOutlet UIWindow *window;

@end
AppDelegate.m
前回はwindowにlabelを突っ込んでたけど、
今回はrootとdetailをもとにSplitViewを作成。
※ rootはNavigationControllerのrootとして設定
#import "EdhitaAppDelegate.h"

@implementation EdhitaAppDelegate

// @synthesize window;


#pragma mark -
#pragma mark Application lifecycle

- (BOOL)application:(UIApplication *)application didFinishLaunchingWithOptions:(NSDictionary *)launchOptions {

    // Override point for customization after application launch.

	window = [[UIWindow alloc] initWithFrame:[[UIScreen mainScreen] bounds]];

	RootViewController *rootViewController = [[RootViewController alloc] init];
	// tableview単体じゃ仕方ないのでnavviewでwrap
	UINavigationController* navigationController = [[UINavigationController alloc] initWithRootViewController:rootViewController];

	DetailViewController *detailViewController = [[DetailViewController alloc] init];

	rootViewController.detailViewController = detailViewController;

	UISplitViewController *splitViewController = [[UISplitViewController alloc] init];
	splitViewController.viewControllers = [NSArray arrayWithObjects:navigationController, detailViewController, nil];
	splitViewController.delegate = detailViewController;

	[window addSubview:splitViewController.view];
	[rootViewController release];
	[navigationController release];
	[detailViewController release];

    [window makeKeyAndVisible];

	return YES;
}


- (void)applicationWillResignActive:(UIApplication *)application {
    /*
     Sent when the application is about to move from active to inactive state. This can occur for certain types of temporary interruptions (such as an incoming phone call or SMS message) or when the user quits the application and it begins the transition to the background state.
     Use this method to pause ongoing tasks, disable timers, and throttle down OpenGL ES frame rates. Games should use this method to pause the game.
     */
}


- (void)applicationDidBecomeActive:(UIApplication *)application {
    /*
     Restart any tasks that were paused (or not yet started) while the application was inactive.
     */
}


- (void)applicationWillTerminate:(UIApplication *)application {
    /*
     Called when the application is about to terminate.
     */
}


#pragma mark -
#pragma mark Memory management

- (void)applicationDidReceiveMemoryWarning:(UIApplication *)application {
    /*
     Free up as much memory as possible by purging cached data objects that can be recreated (or reloaded from disk) later.
     */
}


- (void)dealloc {
    [window release];
    [super dealloc];
}


@end
完成
[まとめ]
第2回目の今回は単純なSplitViewアプリを作ってみました。
ようやくIBでSplitViewプロジェクトを作成したものに追いついたわけですね。
次回以降いよいよテキストエディタの機能を追加していきます。
ご期待下さい。
[コード]
今回のコードは「Edhita2.zip」に入っています。
GitHubのdownloadページからダウンロードして下さい。
Downloads for tnantoka's Edhita - GitHub
PR